

When designing screw bosses for plastic injection molding, certain parameters must be taken into account such as wall thickness, coring, draft, etc. When prototyping with 3D printing, especially with FDM (Fused Deposition Modeling), these bosses can become finicky and delicate features to work with.
BACKGROUND:
As we know, slicing software is a necessary part of preparing your model for 3D printing. This software can usually be configured to input how many loops or perimeter rings will make up the outer shell of the part, while you can then control the density of the filler material- or how solid/hollow the part will be.
When you get to screw bosses, it is often the case that a wall thickness of 0.060” leaves only enough room for two-3 perimeter loops, and no infill depending on the orifice diameter of your printer's hot end. This will produce a situation as shown below:

The image shows a screw boss, with essentially two concentric cylinders of a single ring of FDM filament. No room for infill material to join the two perimeter rings. This makes installing fasteners or threaded inserts tricky.
HI-LOs & PLASTITES
These fasteners are designed for homogenous and solid plastic parts to displace and cut material as they are installed. They are thread forming and/or cutting. With a FDM print, these fastener threads just push outwards on the cylindrical walls and often split the boss, shearing at the meeting of layers, as the manufacturing process is a mechanical joining of plastic layers via heat.
THREADED INSERTS
As prototypes go, there are often validation tests. If an assembly needs rebuilding numerous times, using a standard screw and a threaded insert is your best bet for assured thread engagement and maintenance of your screw boss's structural integrity.
A drill diameter is often provided for preparing your part to receive the insert. When mocking up or assembling a prototype, different approaches can be made to secure an insert into a drilled out screw boss, such as using epoxy or other bonding adhesives.
FDM manufacturing has been making leaps and bounds in terms of precision, but screw bosses especially tend to close up at least a few thousandths, making your assigned drill diameter too tight for your insert. Sometimes if you know the precision of your 3D printer, you can compensate for these inaccuracies. If you don't want to make design changes especially for prototyping, using a hand drill to recreate the drill diameter is usually a first thought. However, with a FDM screw boss and only two wall thicknesses, your inner cylinder will be destroyed as shown below:

As seen, the inner perimeter has ruptured. This can cause misalignment of your hardware, which can be a big deal depending on your assembly and testing.
HEAT THINGS UP A BIT
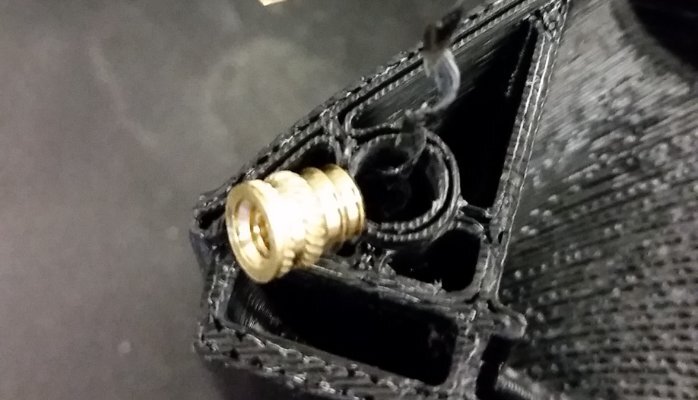
To avoid destroying the screw boss walls with a drill, one can go back to the roots on how the inserts were designed for injection molded plastics. They have features on which the liquid plastic can cling to, such as the ridges and lips shown in the image above. Obviously, with FDM 3D printing, these inserts are installed after the plastic has cooled. Installing inserts will be different with these prints unless...
We use the thermoplastic properties of FDM material to our advantage.
If you can heat up the insert, it can be guided into the screw boss, with the plastic melting around it as it is installed. There may be some tools out there that are specifically designed for this, but it is also easily achievable using the following method:

This is a common MAPP gas torch, and only heat the insert for a few seconds. Such a small brass component will warm up rapidly. Be sure to use tools that can keep your hand as far away as possible while maintaining precision and manipulation.
Then, as shown below, with the pliers and hardware in the same grip, install the insert into your FDM part. ***MIND YOUR ORIENTATION AND CONCENTRICITY.

Hold the hardware until it has cooled. If you let go, even just the weight of the screw will tip the insert out of axis with the screw boss.
Once it has cooled down, remove the screw and you have a very secured threaded insert, with your FDM screw boss structurally intact.

Success!